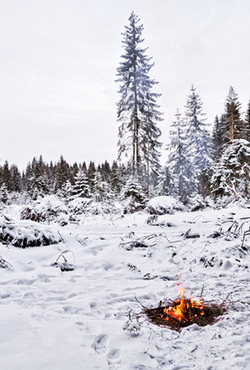
In spite of the best of intentions, during the winter months old Murphy can show up at anytime and throw you into a winter survival situation. Even though properly dressed for the outdoors, in order to survive a cold night you will need to start a fire.
When forced into winter survival mode you might ask yourself, "How would a twenty-first century woodsman start a fire in these conditions?"
Unfortunately, old man winter won’t come running to answer that question. And like thousands of people have found out over the centuries, when it comes to a winter survival situation, you're on your own when starting a fire.
Only planning, practice and advance preparation can get you through the cold and darkness.
This brings us to our next principle of winter survival: Fire is hardest to start when you need it the most.
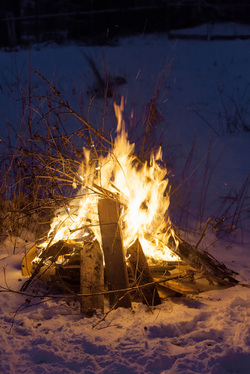
Almost anyone can start a fire when its ninety degrees outside, the sun is shining and it hasn't rained for a couple of weeks. But, when you're cold, wet, hungry and thirsty, when everything around you is cold and wet, when your fingers are so numb you can barely feel your fingertips and the temperature is headed down; it’s then you discover if your fire making skills are up to the challenge.
Who can forget in the Jack London classic, To Build A Fire, where the main character struggles in vain to get a fire going at seventy-five below zero? Even though the story is considered fiction, it's a worthwhile read to get the proper mindset before you head into the wilderness.
Probably more than any other season of the year, winter survival requires that you develop the necessary self-reliance skills before an emergency arises.
There are many methods of fire starting available to the twenty-first century woodsman. Here is a list of twenty-five fire starting methods any outdoorsman can use.
These should be carried in your winter survival kit and be in your vehicle should you need them. These methods should also be practiced in all kinds of conditions before you need them.
Spark Based Fire
1. Flint and steel
2. Ferrocerrium rod
3. Butane lighter
4. Butane torch
5. Propane torch
Friction Based Fire
1. Bow drill
2. Hand drill
3. Pump drill
4. Rope drill
5. Crutch drill
6. Mouth drill
7. Fire thong hand drill
8. Polynesian fire plow
9. Aboriginal fire saw
10. Four person fire log
Heat Based Fire
1. Fire Piston
2. Magnifying lens (Glass lens, Fresnel lens, balloon, ice)
3. Concave lens or reflector (headlight or flashlight reflector, chocolate bar and soda can)
4. Nine-volt battery and fine steel wool
5. Car/atv/motorcyle/snowmoble etc. battery, wire and tinder
Chemical Based Fire
1. Matches/fire starters (Yes, this is a chemical fire. Most matches depend on a two part chemical reaction with one half of the chemical on the match head and the other half on the box or book of matches. It is not just a strip of sandpaper! Make sure you pack the striker turned away from the match heads so that it won't accidentally ignite or rub off.
Strike anywhere matches have both chemicals on the tip and when it is struck against a rough surface the two combine to ignite. By the way, a match is the perfect fire starter. It has the ignition source and a small piece of tinder attached. Unfortunately, it is a one-time use and you can only carry so many at a time. Plus, they must be kept absolutely moisture free unless they are dipped in wax or paraffin or are already waterproofed from the factory. Still, keep them dry if at all possible!
2. Potassium Permanganate and glycerin ( Hint: Use a couple of drops of water to accelerate the exothermic reaction) Also note that in very cold temperatures this may not work even if you warm up the elements beforehand. Keep them widely separated if at all possible.
(Potassium Permanganate can be found in the water treatment area of hardware stores and pool stores and glycerin can be found in medical supply stores and pharmacies and has many uses for the outdoorsman as a treatment for insect bites, burn or chafing ointment, treatment for poison ivy, sumac or oak rashes, mild bug repellant, lubricant for a bow drill socket and can be mixed with wood ash to make a simple but effective soap! Truly a multi-purpose item!)
3. Emergency Flare (Even sold in half sizes for carrying convenience)
Whenever you go into the great outdoors, you should always carry at least three kinds of methods of starting fire. Usually, these are a butane lighter, a ferrocerrium rod and matches of some kind. But whatever you choose, make sure that you practice in all types of weather and conditions. Go ahead, challenge yourself, start a fire in the woods in the pouring rain with just one match! It can be done, but requires proper preparation and skill.
Proper Planning When the hunter/gatherer's of yesteryear walked through the wilderness, they did not wait until they arrived at their campsite to gather what is probably the most important material for starting a fire, tinder. As they traveled they were on the lookout for cedar bark, dry grasses, cattail fluff, Canadian thistle down and any other small dry materials that might be needed for fire starting.
You should do the same and carry a spare Ziploc bag for these items in your winter survival kit. The woodsmen of yesterday would protect their hearth, cord and spindle from the elements as carefully as we would our matches today. When Otzi the ice man was discovered in the Otztal Alps in the fall of 1991, he had in his hand a cylinder of birch bark with freshly picked maple leaves and grass, insulating what was a live coal from the elements. He also carried in a clever belt pouch, flint and four pieces of true tinder fungus (Fomes fomentarius) with traces of iron pyrites in their fibers. No iron pyrites were found on or around the site of the discovery, so he must have considered his fire carrying skills equal to the task of the mountain wilderness and the 10,400-foot altitude where he died. Note that he died from a shoulder injury caused by an arrow, not because he was unprepared.
Proper Preparation When preparing to build a fire in a winter survival situation, you must gather your materials first. Gather all the tinder and wood that you need before you start to build the fire.
Tinder may be char cloth, SRO's Mini Inferno, cotton balls, dryer lint, cedar bark fluff, jute twine, sock threads (if they are cotton), small sticks of various sizes etc. Note that larger branches and logs do not need to be cut or split, they may easily be burned in half when the fire is going. Remember winter survival is always a calorie game so don't waste time and energy cutting wood to size.
For ideal winter survival one should probably have a small axe or hatchet to split wet wood and get at the dry inner core, a small saw for cutting large pieces down to size in order to be able to drag them to the fire area and a sharp knife with which to make fuzz sticks. (This is accomplished by shaving small curls of wood left attached to the stick.)
The author has found that it is best to gather a small bundle of sticks from pencil size up to thumb size, dry them out and keep them in a Ziploc bag. Do this when it is not raining, lay them up for a week or so and then pack them with your winter survival kit.
Spark Fire With Cotton Balls and Petroleum Jelly
Also for spark-based fire starting it's hard to beat a cotton ball (make sure it is 100 per cent cotton and not a synthetic) mixed with petroleum jelly and stored in a plastic 35mm film canister. Film canisters can still be had for free at many in-store photo labs. (The petroleum jelly on the cotton balls has many multiple uses including lip balm, soothing galled inner thighs, coating for wind-chapped skin, etc.)
Along with these items, by including a few small sticks of fatwood or greasewood, split small and broken in half, a fire may be started in almost any condition.
Start with the cotton ball (just a piece is needed) drawn out and stretched, then lay two small pieces of fatwood on top, crisscrossed, then lay some pencil thick twigs from your Ziploc bag on top in a tepee fashion and using ferrocerium rod or match etc., apply the spark/fire to the cotton ball. Within short order you will have a small blazing fire.
Of course, in a winter survival situation, you must be careful that the ground on which you build your fire is not too wet. If so, then build a platform of sticks (as dry as possible) upon which to place your fire. If you don't do this, the water and steam from the ground will make it nearly impossible to keep your fire going.
When the fire has reached sufficient strength, then even wet wood may be burned. A fire is like a baby, it must be nursed, nurtured and fed from small to large sticks until it can burn on it's own.
Proper Practice As has already been noted, you must plan and prepare for a proper fire. But, you must also practice, practice, practice! Make sure that you truly own the skill before your life and the lives of those you care about depend on it. This is especially true for all the primitive fire starting methods like the widely touted bow drill.
When you try to start a fire with these methods you will soon learn to appreciate modern fire starters a whole lot more. Along with the practice of making fire, you should practice maintaining fire (of the proper size, a big fire takes a lot of wood, you can get closer to a smaller fire and it is more environmentally friendly, always cook on coals not flame etc.) and practice carrying fire.
Carrying fire could be a lifesaver and was practiced to an art in ancient times. Carrying fire was done by Otzi the ice man and is mentioned in the Biblical Book of Genesis where Abraham carried fire from the base of the mountain to the area of sacrifice. This story dates to somewhere around 2000 to 1500 BC!
The last three areas of winter survival and fire starting are these:
1. The Sure Fire No matter where you find yourself, always carry the ability to start a for sure fire. For some this may be a ferrocerrium rod, for others this may be a lighter, a match, a torch or an emergency flare. Just make sure that if conditions are the worst (Cold, wet, hypothermic etc.) that you can get that fire started.
2. The Next Fire Always think or plan ahead. It is easier to keep a fire going in a winter survival situation than it is to start it again. If you use flint and a steel striker, make sure that you prepare your char cloth in this fire for the next fire. Save some tinder, char cloth, jute twine as well. Dry tinder should be used sparingly as it is one of the hardest items to find in winter.
3. The Last Fire No matter how long you are in a winter survival situation, you should try and keep fire-starting materials for that last ditch fire. Keep at least one match, don't use all the butane in your lighter (They are good on average for about fifty fires or so), save some good tinder and so on. Keep your fire going and practice primitive fire starting methods and save your commercial and irreplaceable fire starters. You never know when you might slip into a creek, get caught in a storm or get overheated and sweaty and need to dry out. The last ditch fire may just save your life!
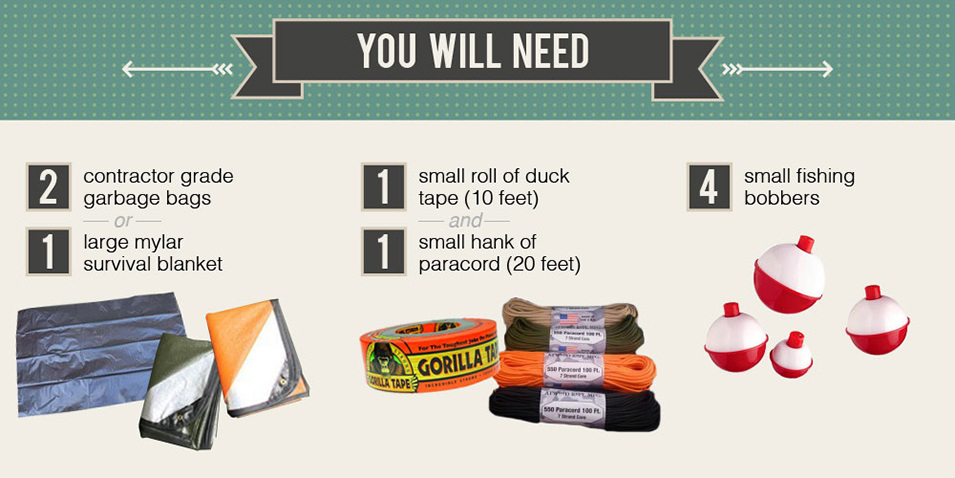
Put together a winter survival kit
Fire starting in a winter survival situation can be difficult at best. So if you find yourself needing the skills, make sure you own the skills. Plan, prepare and practice. Put together a winter survival kit and pay special attention to your fire starting materials. Go out in your back yard and practice making fire, maintaining fire and carrying fire.
And when you're in that winter survival situation, start that sure fire, keep in mind the next fire and keep something back for the last fire. And with a little help from Above, you'll be back with your loved ones, safe and sound and with a great winter survival story to tell! - by James Bender
When forced into winter survival mode you might ask yourself, "How would a twenty-first century woodsman start a fire in these conditions?"
Unfortunately, old man winter won’t come running to answer that question. And like thousands of people have found out over the centuries, when it comes to a winter survival situation, you're on your own when starting a fire.
Only planning, practice and advance preparation can get you through the cold and darkness.
This brings us to our next principle of winter survival: Fire is hardest to start when you need it the most.
Almost anyone can start a fire when its ninety degrees outside, the sun is shining and it hasn't rained for a couple of weeks. But, when you're cold, wet, hungry and thirsty, when everything around you is cold and wet, when your fingers are so numb you can barely feel your fingertips and the temperature is headed down; it’s then you discover if your fire making skills are up to the challenge.
Who can forget in the Jack London classic, To Build A Fire, where the main character struggles in vain to get a fire going at seventy-five below zero? Even though the story is considered fiction, it's a worthwhile read to get the proper mindset before you head into the wilderness.
Probably more than any other season of the year, winter survival requires that you develop the necessary self-reliance skills before an emergency arises.
There are many methods of fire starting available to the twenty-first century woodsman. Here is a list of twenty-five fire starting methods any outdoorsman can use.
These should be carried in your winter survival kit and be in your vehicle should you need them. These methods should also be practiced in all kinds of conditions before you need them.
Spark Based Fire
1. Flint and steel
2. Ferrocerrium rod
3. Butane lighter
4. Butane torch
5. Propane torch
Friction Based Fire
1. Bow drill
2. Hand drill
3. Pump drill
4. Rope drill
5. Crutch drill
6. Mouth drill
7. Fire thong hand drill
8. Polynesian fire plow
9. Aboriginal fire saw
10. Four person fire log
Heat Based Fire
1. Fire Piston
2. Magnifying lens (Glass lens, Fresnel lens, balloon, ice)
3. Concave lens or reflector (headlight or flashlight reflector, chocolate bar and soda can)
4. Nine-volt battery and fine steel wool
5. Car/atv/motorcyle/snowmoble etc. battery, wire and tinder
Chemical Based Fire
1. Matches/fire starters (Yes, this is a chemical fire. Most matches depend on a two part chemical reaction with one half of the chemical on the match head and the other half on the box or book of matches. It is not just a strip of sandpaper! Make sure you pack the striker turned away from the match heads so that it won't accidentally ignite or rub off.
Strike anywhere matches have both chemicals on the tip and when it is struck against a rough surface the two combine to ignite. By the way, a match is the perfect fire starter. It has the ignition source and a small piece of tinder attached. Unfortunately, it is a one-time use and you can only carry so many at a time. Plus, they must be kept absolutely moisture free unless they are dipped in wax or paraffin or are already waterproofed from the factory. Still, keep them dry if at all possible!
2. Potassium Permanganate and glycerin ( Hint: Use a couple of drops of water to accelerate the exothermic reaction) Also note that in very cold temperatures this may not work even if you warm up the elements beforehand. Keep them widely separated if at all possible.
(Potassium Permanganate can be found in the water treatment area of hardware stores and pool stores and glycerin can be found in medical supply stores and pharmacies and has many uses for the outdoorsman as a treatment for insect bites, burn or chafing ointment, treatment for poison ivy, sumac or oak rashes, mild bug repellant, lubricant for a bow drill socket and can be mixed with wood ash to make a simple but effective soap! Truly a multi-purpose item!)
3. Emergency Flare (Even sold in half sizes for carrying convenience)
Whenever you go into the great outdoors, you should always carry at least three kinds of methods of starting fire. Usually, these are a butane lighter, a ferrocerrium rod and matches of some kind. But whatever you choose, make sure that you practice in all types of weather and conditions. Go ahead, challenge yourself, start a fire in the woods in the pouring rain with just one match! It can be done, but requires proper preparation and skill.
Proper Planning When the hunter/gatherer's of yesteryear walked through the wilderness, they did not wait until they arrived at their campsite to gather what is probably the most important material for starting a fire, tinder. As they traveled they were on the lookout for cedar bark, dry grasses, cattail fluff, Canadian thistle down and any other small dry materials that might be needed for fire starting.
You should do the same and carry a spare Ziploc bag for these items in your winter survival kit. The woodsmen of yesterday would protect their hearth, cord and spindle from the elements as carefully as we would our matches today. When Otzi the ice man was discovered in the Otztal Alps in the fall of 1991, he had in his hand a cylinder of birch bark with freshly picked maple leaves and grass, insulating what was a live coal from the elements. He also carried in a clever belt pouch, flint and four pieces of true tinder fungus (Fomes fomentarius) with traces of iron pyrites in their fibers. No iron pyrites were found on or around the site of the discovery, so he must have considered his fire carrying skills equal to the task of the mountain wilderness and the 10,400-foot altitude where he died. Note that he died from a shoulder injury caused by an arrow, not because he was unprepared.
Proper Preparation When preparing to build a fire in a winter survival situation, you must gather your materials first. Gather all the tinder and wood that you need before you start to build the fire.
Tinder may be char cloth, SRO's Mini Inferno, cotton balls, dryer lint, cedar bark fluff, jute twine, sock threads (if they are cotton), small sticks of various sizes etc. Note that larger branches and logs do not need to be cut or split, they may easily be burned in half when the fire is going. Remember winter survival is always a calorie game so don't waste time and energy cutting wood to size.
For ideal winter survival one should probably have a small axe or hatchet to split wet wood and get at the dry inner core, a small saw for cutting large pieces down to size in order to be able to drag them to the fire area and a sharp knife with which to make fuzz sticks. (This is accomplished by shaving small curls of wood left attached to the stick.)
The author has found that it is best to gather a small bundle of sticks from pencil size up to thumb size, dry them out and keep them in a Ziploc bag. Do this when it is not raining, lay them up for a week or so and then pack them with your winter survival kit.
Spark Fire With Cotton Balls and Petroleum Jelly
Also for spark-based fire starting it's hard to beat a cotton ball (make sure it is 100 per cent cotton and not a synthetic) mixed with petroleum jelly and stored in a plastic 35mm film canister. Film canisters can still be had for free at many in-store photo labs. (The petroleum jelly on the cotton balls has many multiple uses including lip balm, soothing galled inner thighs, coating for wind-chapped skin, etc.)
Along with these items, by including a few small sticks of fatwood or greasewood, split small and broken in half, a fire may be started in almost any condition.
Start with the cotton ball (just a piece is needed) drawn out and stretched, then lay two small pieces of fatwood on top, crisscrossed, then lay some pencil thick twigs from your Ziploc bag on top in a tepee fashion and using ferrocerium rod or match etc., apply the spark/fire to the cotton ball. Within short order you will have a small blazing fire.
Of course, in a winter survival situation, you must be careful that the ground on which you build your fire is not too wet. If so, then build a platform of sticks (as dry as possible) upon which to place your fire. If you don't do this, the water and steam from the ground will make it nearly impossible to keep your fire going.
When the fire has reached sufficient strength, then even wet wood may be burned. A fire is like a baby, it must be nursed, nurtured and fed from small to large sticks until it can burn on it's own.
Proper Practice As has already been noted, you must plan and prepare for a proper fire. But, you must also practice, practice, practice! Make sure that you truly own the skill before your life and the lives of those you care about depend on it. This is especially true for all the primitive fire starting methods like the widely touted bow drill.
When you try to start a fire with these methods you will soon learn to appreciate modern fire starters a whole lot more. Along with the practice of making fire, you should practice maintaining fire (of the proper size, a big fire takes a lot of wood, you can get closer to a smaller fire and it is more environmentally friendly, always cook on coals not flame etc.) and practice carrying fire.
Carrying fire could be a lifesaver and was practiced to an art in ancient times. Carrying fire was done by Otzi the ice man and is mentioned in the Biblical Book of Genesis where Abraham carried fire from the base of the mountain to the area of sacrifice. This story dates to somewhere around 2000 to 1500 BC!
The last three areas of winter survival and fire starting are these:
1. The Sure Fire No matter where you find yourself, always carry the ability to start a for sure fire. For some this may be a ferrocerrium rod, for others this may be a lighter, a match, a torch or an emergency flare. Just make sure that if conditions are the worst (Cold, wet, hypothermic etc.) that you can get that fire started.
2. The Next Fire Always think or plan ahead. It is easier to keep a fire going in a winter survival situation than it is to start it again. If you use flint and a steel striker, make sure that you prepare your char cloth in this fire for the next fire. Save some tinder, char cloth, jute twine as well. Dry tinder should be used sparingly as it is one of the hardest items to find in winter.
3. The Last Fire No matter how long you are in a winter survival situation, you should try and keep fire-starting materials for that last ditch fire. Keep at least one match, don't use all the butane in your lighter (They are good on average for about fifty fires or so), save some good tinder and so on. Keep your fire going and practice primitive fire starting methods and save your commercial and irreplaceable fire starters. You never know when you might slip into a creek, get caught in a storm or get overheated and sweaty and need to dry out. The last ditch fire may just save your life!
Put together a winter survival kit
Fire starting in a winter survival situation can be difficult at best. So if you find yourself needing the skills, make sure you own the skills. Plan, prepare and practice. Put together a winter survival kit and pay special attention to your fire starting materials. Go out in your back yard and practice making fire, maintaining fire and carrying fire.
And when you're in that winter survival situation, start that sure fire, keep in mind the next fire and keep something back for the last fire. And with a little help from Above, you'll be back with your loved ones, safe and sound and with a great winter survival story to tell! - by James Bender


 RSS Feed