Everyone that spends time in the outdoors should have some sort of water filter in their kit. Whether it's a Sports Bottle type filter, a Canteen type filter, or at least a Survival Straw. There are far too many people that head out for a day trip, or a 3 day'er, and up on Search and Rescue's docket.
However, in a survival situation, a long term stint in the field, or after prolonged use, those filtration systems will stop working eventually. What then? What you need is the "know how" to build one of your own.
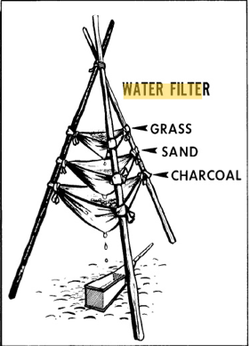
While it may not be the high tech 99.9% guaranteed microbial, and virus filter, it's pretty close if you do it right. Here is a drawing that will help you get the picture.
It is a simple concept, and it works great if you follow these instructions. Use plenty of grass to aerate the water in stage 1.
Try to wash the sand in a creek or stream first to get the loose dirt out, then fill the cloth just enough to not overload it once it is full of water, the sand in Stage 2 will remove all of the small debris that gets through stage one.
In Stage 3, use crushed charcoal made from your fire pit (not ashes, do some homework on how to make charcoal in a can) This stage helps to minimize both microbial and virus involvement.
Stage 4 is boiling the water if you can. Boiling is highly recommended. If you can't, this 3 Stage filter removes many of your problems, and greatly increases your chance of having a water supply you can trust.
However, in a survival situation, a long term stint in the field, or after prolonged use, those filtration systems will stop working eventually. What then? What you need is the "know how" to build one of your own.
While it may not be the high tech 99.9% guaranteed microbial, and virus filter, it's pretty close if you do it right. Here is a drawing that will help you get the picture.
It is a simple concept, and it works great if you follow these instructions. Use plenty of grass to aerate the water in stage 1.
Try to wash the sand in a creek or stream first to get the loose dirt out, then fill the cloth just enough to not overload it once it is full of water, the sand in Stage 2 will remove all of the small debris that gets through stage one.
In Stage 3, use crushed charcoal made from your fire pit (not ashes, do some homework on how to make charcoal in a can) This stage helps to minimize both microbial and virus involvement.
Stage 4 is boiling the water if you can. Boiling is highly recommended. If you can't, this 3 Stage filter removes many of your problems, and greatly increases your chance of having a water supply you can trust.

 RSS Feed